|
If you have read the pre-steps
on the previous page, you are ready to get started cooking
your eggs.
Take the eggs out of the fridge for half an
hour prior to cooking them. This reduces the amount shock
of temperature change when the eggs are boiled, therefore
reducing the amount of cracks in the shells, and seems to
be helpful to make the egg easier to peel.
Place your eggs into a pot large enough to hold
them comfortably. You will need to choose a good size pot
in order to help prevent the eggs from bumping into each other
while cooking. Any unwanted bumping could cause the eggs to
crack prematurely.
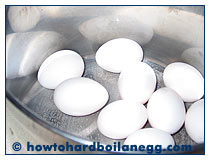 In
the picture here, you can see I've chosen a nice size pot
leaving the eggs well-spaced. In
the picture here, you can see I've chosen a nice size pot
leaving the eggs well-spaced.
As far as what type of pot to use - this one
is stainless steel - but it doesn't seem to matter what the
pot is made of to obtain a good result. I've boiled eggs in
everything from glass to aluminum and the following steps
work for them all.
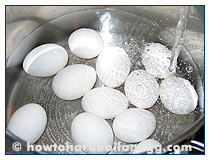
Next, fill your pot with cold
water to cover over the eggs by about one inch. You can see
from the picture just below that there is room left in the
pot as there is no need to overfill with water or overcrowd
the eggs.
Add about 1 teaspoon of salt. This increases the temperature necessary to get the water to boiling and will ensure that the eggs benefit from this tempature increase to cook fully after they have set, as specified later in my instructions. Read ON!
 Some
people have asked me if it is helpful to make a small hole
at one end of the egg to help facilitate cooking.
Perhaps you have heard of this too or seen it done.
Personally, I have not found
that it produces a better result. Sometimes I have accidentally
made the hole too large, causing some whites to ooze out the
end while cooking. This in turn causes the cooked and peeled
egg to be a bit lop-sided. That's not important if you are
making egg salad, but for deviled eggs you like the cooked
white to stay nice and round. (Discard any of this oozed-out
debris with your cooking water once you are finished cooking
the eggs). Some
people have asked me if it is helpful to make a small hole
at one end of the egg to help facilitate cooking.
Perhaps you have heard of this too or seen it done.
Personally, I have not found
that it produces a better result. Sometimes I have accidentally
made the hole too large, causing some whites to ooze out the
end while cooking. This in turn causes the cooked and peeled
egg to be a bit lop-sided. That's not important if you are
making egg salad, but for deviled eggs you like the cooked
white to stay nice and round. (Discard any of this oozed-out
debris with your cooking water once you are finished cooking
the eggs).
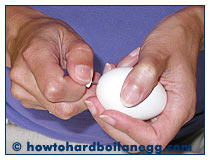 If
you would like to experiment with a hole at the end
to see if it makes the cooked eggs rounder-looking or easier
to peel, the hole is made at the fat end of the egg. Look
to the right to see where the hole should go. A push-pin is
a handy tool to make the hole, but be careful not to push
the push-pin into your hand or to hold the egg so firmly that
you break the shell. Gently rotate the pin back and forth
in one spot then push firmly. It helps to brace your elbows
against the side of your body. Allow the end of the push-pin
to enter the egg only once then withdraw. Do not enlarge the
hole by pushing the pin in and out a few times. There's no
benefit to this. You then place the eggs in pot, add the water
as above and get ready for the next step ... If
you would like to experiment with a hole at the end
to see if it makes the cooked eggs rounder-looking or easier
to peel, the hole is made at the fat end of the egg. Look
to the right to see where the hole should go. A push-pin is
a handy tool to make the hole, but be careful not to push
the push-pin into your hand or to hold the egg so firmly that
you break the shell. Gently rotate the pin back and forth
in one spot then push firmly. It helps to brace your elbows
against the side of your body. Allow the end of the push-pin
to enter the egg only once then withdraw. Do not enlarge the
hole by pushing the pin in and out a few times. There's no
benefit to this. You then place the eggs in pot, add the water
as above and get ready for the next step ...
Now, time to get these eggs
on the stove ...
|